| Before being able to serve files and manage your users, you have to create a domain. This can be done easily with the help of the wizard.
Defining a domain is essential since this will start a new server to welcome your users.
For example, you define the IP binding and SSL options in the domain options.
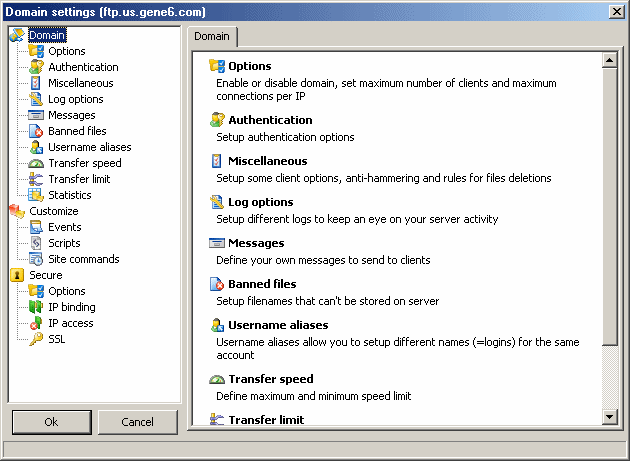
Clicking on each main category (Domain, Customize, Secure) will bring a summary page detailing each sub category.
| |
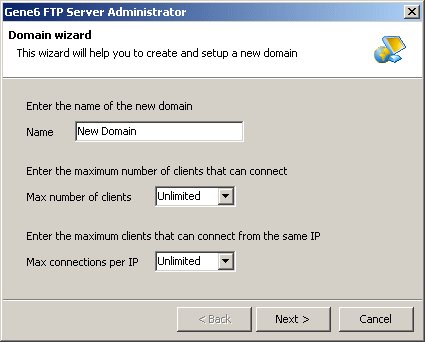
| To help you setup a new Domain, the wizard will prompt you with the basic options you need to set.
It will allow you to setup the IP addresses to listen to, select or create the SSL certificate to use, choose the logs you want and create an anonymous account.
First step, choose the new domain name and the overall limits for number of client and max number of connections from the same IP address.
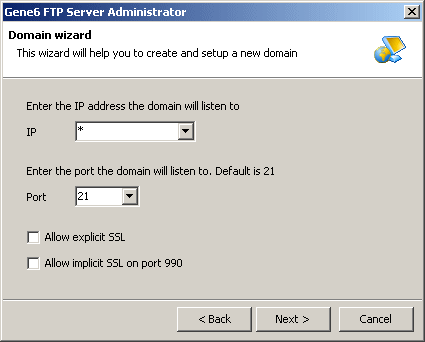
Second step, select the IP address that the domain will use (default is *, for all available IP addresses), specify the port number to use (21 is the default) and choose if you want to allow SSL connections (implicit/explicit).
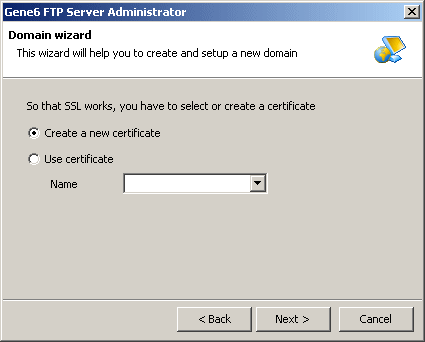
Third step, if you have enabled SSL then you will be prompted to select a certificate or to create one. If you select to create a new one, the SSL creation wizard will be launched after this wizard.
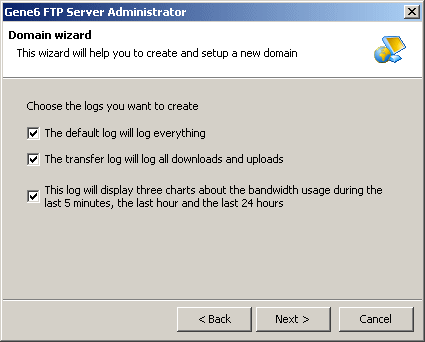
Fourth step, choose whether you want all logs or only some of them (default log, transfer log, bandwidth report).
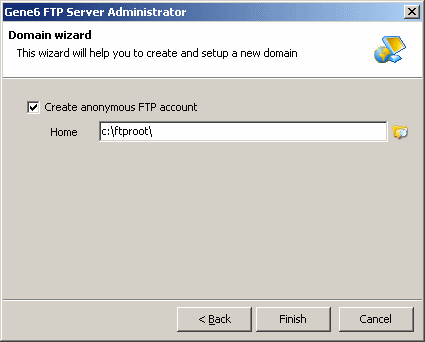
Last step, if you want to create an anonymous account for this domain, check the box and enter the home directory. This account will only have read access to this folder and its sub directories.
The full options windows will be open after clicking on finish. This can be disabled in Administrator / Tools / Options / Open domain's properties after creation.
| |
| 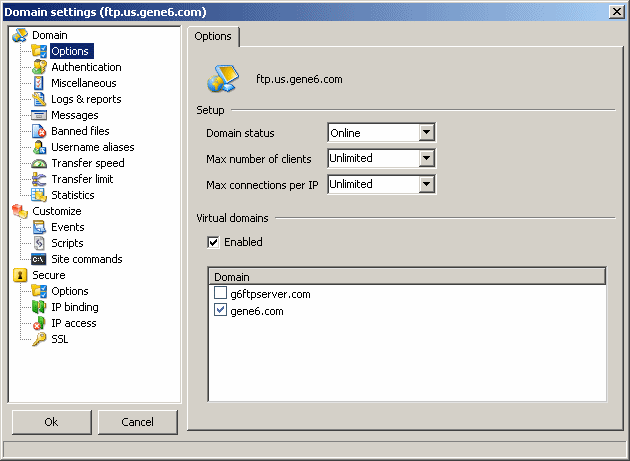
Options :
Domain status : online, offline, closed (new clients won't be able to log into this domain).
Max number of clients : limit the number of users logged on this domain simultaneously.
Max connections per IP : limit the number of connections from the same IP.
Virtual domains :
Virtual domains allow you to host multiple domains on only one IP:Port interface. Clients log on different domains by specifying it in their username : to log as anonymous on domain "gene6.com", the client will use " anonymous@gene6.com" as his username to log in.
Enabled : enable the use of virtual domains on this domain : clients will be able to log on other domains from this domain.
Domain list : clients will be able to log on the domains that are checked.
Example :
Consider that we have 2 domains setup : one called "internet" (our main domain which is already setup and accepting connections) and the other "gene6.com" which you have just created (default options, no ip binding set).
Setup the "internet" domain with "gene6.com" as a virtual domain (enable it on the options page). Our "internet" domain does not require any account to be defined but you can still have some (they will be accessible without anything suffixed (no "@gene6.com" ...).
In "gene6.com" domain, create your account, let's say "john" with the usual password and options set.
Now connect to your server with username " john@gene6.com", you should see the connection on the main domain then, after USER john@gene6.com command is submitted, the connection is reported in the "gene6.com" domain log.
If you submit "john" you will receive an error if the main "internet" domain does not have this account.
The advantage of virtual domains is that you have everything reported in a separate domain (logs, settings, user accounts ...) instead of the main domain which allows you to give an administrator access to their own domain even if you have only 1 public ip. The inconvenience is that the main domain receives the initial connections and only the activity after USER command is reported in the virtual domain.
| |
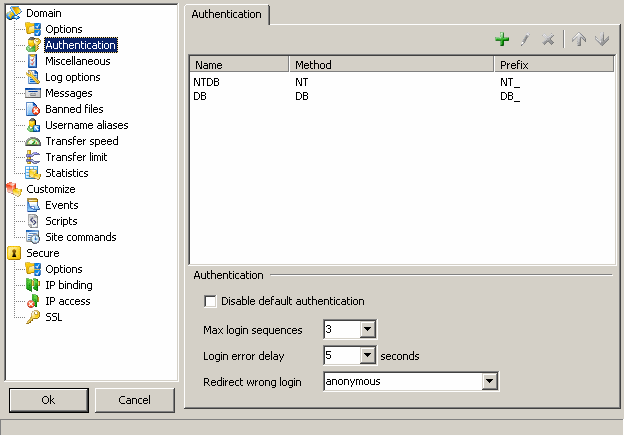
| Here you are presented the Authentication options.
If you are not familiar with advanced settings (or simply do not think you need advanced authentication), do not change settings on this page.
Authentication list : add/modify new authentication method (see below).
Disable default authentication : when additional authentication methods are defined you can choose to not have built-in authentication. Built-in authentication makes use of the password defined in user accounts.
Max login sequences : maximum number of USER/PASS attempts to login. If a user tries too many times in the same session, he will be disconnected.
Login error delay : impose a delay after PASS command if authentication fails. This is mainly to defeat brute force password testing.
Redirect wrong login : in case, the authentication fails or the user doesn't have the rights to login (account disabled, address denied, etc.), you can redirect the user to use another account automatically.
Advanced authentication :
Though being common and simple to use, built-in G6FTP Server authentication might not be enough powerful in some particular cases such as database driven sites.
To fill that gap, Authentication options tab will allow you to setup an alternative (or additional) login method at domain level.
To define a new authentication method, click on the '+' button, you will be presented a new window to setup the options.
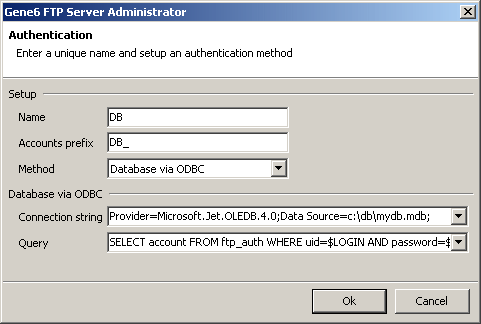
Name : select a method name to identify this authentication.
Accounts prefix : the prefix will be used to search for corresponding accounts in the server accounts list if a login/password matches the authentication method.
Method : the type of authentication, by default, two methods are implemented using the NT user database or a database via ODBC.
Note : you may need to change the service account the server is running under to an account with more permissions to authenticate agains NT database.
1) NT users database :
Domain : enter the NT domain of the windows user account (empty means local domain).
Impersonate : the authenticated user will impersonate his Windows account, NTFS and Windows restrictions will apply and file modifications will be reported as being from this user.
In case of successful authentication against NT database, the corresponding server account will be : Accounts prefix + Type of NT account (example : "NT_" + "User"). Three types of returned values exist for NT accounts : "Admin", "PowerUser" and "User".
Example with a defined rule like Name = "NT", Prefix = "NT_", Method = "NT user database" :
- User submits login = "Charly", password = "1a2b3c"
- NT authentication will return "NT_admin" to G6FTP Server if "Charly" is Administrator or "NT_user" if he is a simple user.
- If NT authentication fails, next authentication method will be tried (until no rule left, then built in server authentication will be tried if 'Disable default authentication' is not checked).
In the case of a successful NT authentication, the corresponding G6FTP Server account will be "NT_user", so it needs to be defined. (You can see that only 3 accounts have to exist, due to the nature of advanced authentication not all user account's options will be applied since they can not be stored for each users).
We suggest to define a main account with access rights based on user account name (in our case it would be like '/' mapped to 'c:\ftp\$DOM_NAME\$USR_NAME\').
Notes :
- At user level, leave default password type (regular stored as MD5) but generate a random password
- Do not enable password type "Authenticate against NT DB" at user level, this is not needed (and will break the domain authentication).
2) Database via ODBC :
DB via ODBC allows you to externalize passwords management. A typical case would be a database driven web site with dynamically created accounts that allows/disallows access with subscription.
Connection string : ODBC connection string necessary to access the database (examples are preset in drop down list).
Query : SQL query that will return the account name (example : 'SELECT account FROM ftp_auth WHERE uid=$LOGIN AND password=$PASSWORD' where '$LOGIN' and '$PASSWORD' are the submitted login and password replaced when the query is sent).
Here is the list of tags you can use in the query :
- $LOGIN : replaced by the quoted client login (example: 'o\'neill')
- $PASSWORD : replaced by the quoted client password (example: 'o\'neill')
- $QLOGIN : replaced by the double quoted client login (example: 'o''neill')
- $QPASSWORD : replaced by the double quoted client password (example: 'o''neill')
- $PASSWORDMD5 : replaced by the quoted MD5 hash of the client password (example: '1ed209c3a1d2093e3f48fcafd3c70915')
Notes :
- SQL Server may require quotes to be doubled, in this case, use $QLOGIN and $QPASSWORD
- Mysql ODBC driver must be installed, see : http://www.mysql.com/products/connector/odbc/
- Do not forget to indicate your SQL server driver in the "Driver={}" parameter of the connection string
- An additional tag is available when a user is logged via a database. $DB(columnname) is replaced by the value of the column "columnname" returned by the SQL query. Note that the column must be returned by the SQL query or this won't return anything.
For instance, you may use this in access rights, if query is 'SELECT account, homefolder FROM ftp_auth WHERE uid=$LOGIN AND password=$PASSWORD', you can add an access right like this : / -> c:\$DB(homefolder).
Like NT authentication, it will return an account name to use.
Live example with a defined rule like Name = "DB", Prefix = "DB_", Method = "Database via ODBC", a database containing a table like : id = "1", uid = "Charly", password = "1a2b3c", account = "ftp_Charly"
- User submits login = "Charly", password = "1a2b3c"
- DB authentication will return "DB_ftp_Charly" to G6FTP Server.
- If DB authentication fails, next authentication method will be tried (until no rules left, then built-in server authentication will be tried if 'Disable default authentication' is unchecked).
Charly will be logged under "DB_ftp_Charly" account.
3) Other : reserved for future use.
| |
|
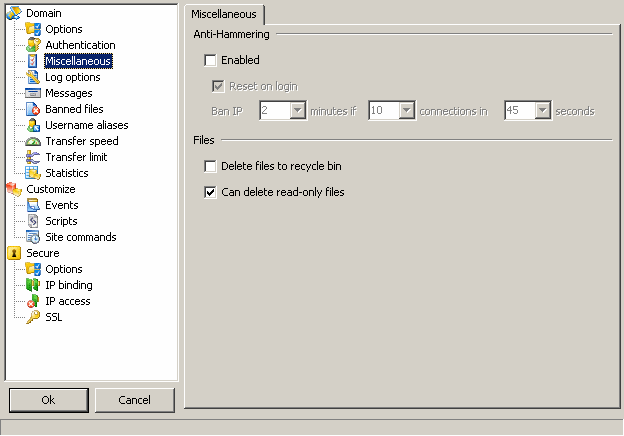
Anti-Hammering :
Enabled : activate, deactivate anti-hammering.
Reset on login : successful login will reset the connection counter.
Ban IP xx minutes if xx connections in xx seconds : the counter will monitor connections and count them, if the number of connections during the period is exceeded, the user IP will be banned.
Files :
Deletes files to recycle bin : files are deleted to recycle bin, they can be restored if needed (make sure you have setup the recycle bin large enough under Windows options).
Can delete read-only files : files with read-only flag can be deleted (if delete access right is given).
| |
| Logs are a crucial point of your server and domains, they will inform you about what is going wrong in your FTP server.
Here are the available options :
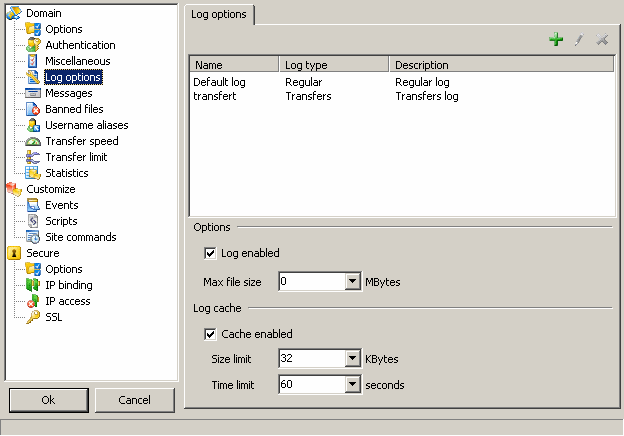
Log enabled : activate, deactivate the log.
Max file size : the log file will be rotated if it reaches the limit you defined (renamed as .0, .1, .2 ...)
Cache enabled : activate, deactivate the cache : for high traffic servers, a cache lessens the work on the hard drive by writing only when the cache is full or has expired.
Size limit : every x KBytes, the log will be written (default is 64KB).
Time limit : every x seconds, the log will be written be it full or not (default is 60s).
(on a highly loaded server, increasing the Size limit and Time limit will decrease the harddrive usage but will increase memory used)
Setup :
Name : this is the name of your log.
Log type : the log you wish to create (other, regular, transfers)
1) Regular log
Typical log reporting commands and replies from client and server.
Method : allows log rotation (single, daily, weekly, monthly, yearly)
File path : log location, you can use tags in the file path, ex :$DOM_NAME.log
Log to file : select what to log : custom, everything, nothing, only client/server commands, only comments.
Log to file, define : customized definition of the log you wish to create with complete control.
Log to screen : same as "Log to file" but to be displayed when viewed from the Administration client.
Log to screen, define : same as "Log to file, define" but to be displayed when viewed from the Administration client.
2) Transfers
Log that reports only transfers of files, upload and download.
Log : what to log : downloads, uploads or both
Method : allows log rotation (single, daily, weekly, monthly, yearly)
File path : log location, you can use tags in the file path, ex :$DOM_NAME-transfers.log
3) Bandwidth
Display bandwidth usage for the last 5 minutes : the graph will contain last 5 minutes datas for upload, download, min, max, average.
Display bandwidth usage for the last hour : the graph will contain last hour datas for upload, download, min, max, average with peaks.
Display bandwidth usage for the last 24 hours : the graph will contain last 24 hours datas for upload, download, min, max, average with peaks.
4) W3C
Log to file : check to write the log to file.
Log to screen : same as "Log to file" but to be displayed when viewed from the Administration client.
Method : allows log rotation (single, daily, weekly, monthly, yearly)
File path : log location, you can use tags in the file path, ex :$DOM_NAME.log
5) Syslog
The syslog option sends the log information to a remote log server.
Server : server to send log to via syslog.
Port : default syslog port is 514.
Facility : default to 11 FTP Daemon information.
Log to server : customized definition of the log you wish to create with complete control.
Log to screen : same as "Log to server" but to be displayed when viewed from the Administration client.
6) Other : reserved for future use.
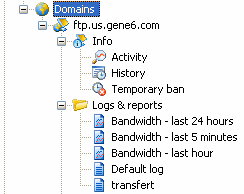
You can define multiple different log to better report information for archiving purpose in G6FTP Server. Logs and reports are viewable after creation in Domains / yourdomain.com / Logs & reports.
Example
We will now see how to setup a basic log for your domain.
- open the Domain Properties page
- select "Log Options"
- choose Add (+ button)
- enter a new name, we'll call it "default"
- select "Regular" as type
- in method select "Log file changed weekly" (we want the server to rotate log every week)
- leave file path with default entry (it will log to /logs directory in your server installation directory)
- leave "Log to file" and "Log to screen" to "Everything".
Voila, you have create a default log file which will log everything and will be rotated every week, click "Ok".
Back to the "Log options" window, check "Log enabled" to start logging, if you want to have log changed if it reaches a file size, let's say 5MB, enter "5" in the "Max file size" option.
(the log will be rotated as logfile.0, logfile.1 ... additionally to our weekly rotation)
| |
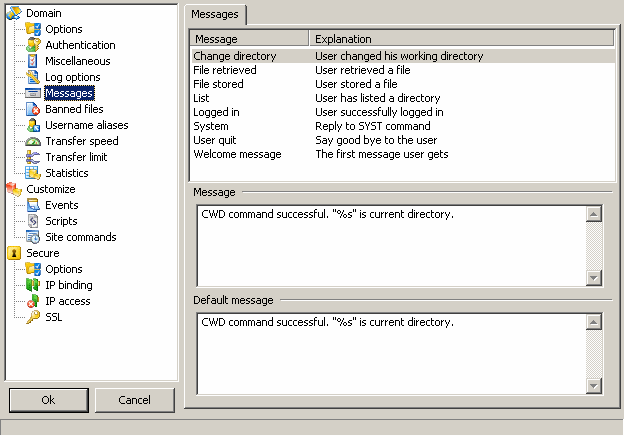
| If you think that built in messages are too cryptic for your users or want to translate them, you can define your own.
This options page will allow you to set new messages for :
- Change directory
- Domain closed
- File retrieved
- File stored
- List
- Logged in
- System
- User quit
- Welcome message
The default message is reported when you edit it. You can also use Tags in the message.
(note : you do not need to add the error code, the server will format the message before sending it back to the client).
Note : the interface lists only main messages, to change minor messages edit the default message in \accounts\settings.ini and add a new entry in [Messages] part:
[Messages]
msgUnauthorizedAccess=Access denied. Your ip does not match.
msgAccountExpired=Sorry your account has expired please contact admin@domain.com.
msgStorOk=Your file has been received, thank you!
You can change the complete list of messages :
http://www.g6ftpserver.com/manuals/devguide_en/messages.html
| |
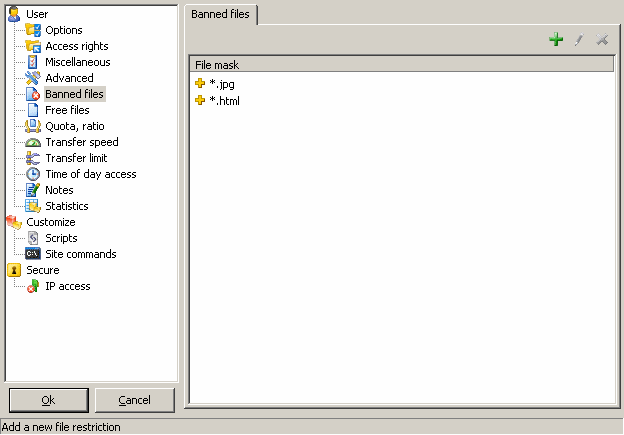
| Banned files are files that can't be stored on server.
You can specify file/path mask (?, * supported) : *.jpg, c:\path\images_200?\
Note :
- rules do not apply to download, only upload
- rules also apply when you rename a file
| |
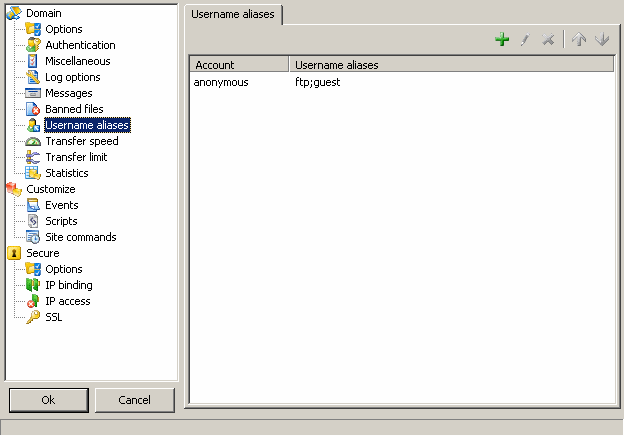
| Username aliases allows you to setup different name (=login) for the same account.
This can be useful for anonymous account which is sometimes call "ftp" or "guest", in that case you just need to add 2 aliases (guest, ftp) for the anonymous account.
| |
| 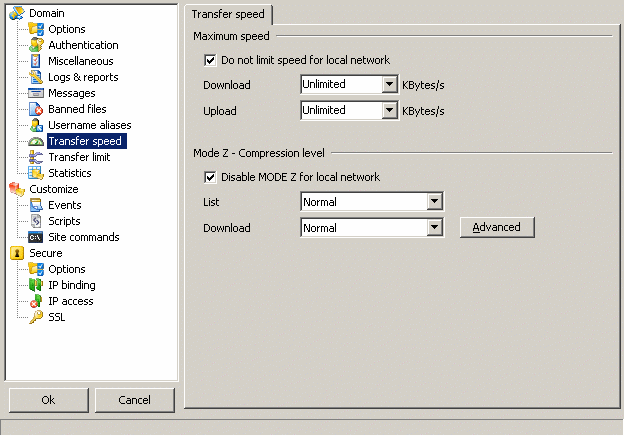
Miscellaneous :
Do not limit speed for local IP : when connected from the lan, speed limit will not be applied.
Maximum speed :
Download : the server will not send files faster than the value set.
Upload : the server will not receive files faster than the value set.
Mode Z - Compression level :
Disable MODE Z for local network : compression is not activated for local connections.
List : set the compression level for list commands (No compression, low, normal, high).
Download : set the compression level for file download (No compression, low, normal, high).
MODE Z uses zlib on the fly compression for FTP data transfers (list and files).
Directory listing, which is text, can be highly compressed with zlib thus boosting the server and client network speed and reactivity.
Webmasters and server administrators will see an increase in productivity : transfers of html, scripts or large logfiles (which are text) no longer needs to be zipped before being sent via ftp and should generally experience a 3-4 times gain in data transfers.
For example, a 60MB log file can turn into a 5MB data exchange when transferred with MODE Z enabled.
Depending on the file content, you will see different results.
Typical gains :
- text files : ~15-20% of original size !
- html files : ~25-30% of original size !
- media, video, sound : ~90-95% of original size
Notes :
- already compressed documents with Zip, Rar, Ace etc. will see virtually no gain at all.
- you will need a compatible FTP client to activate MODE Z (like SmartFTP, FTP Voyager ...)
References :
You can refer to the zlib author's website for more information : http://www.gzip.org/zlib/
If you are a FTP software developer, we recommend you to follow this implementation :
http://www.g6ftpserver.com/?page=rfc-modez.txt
| |
|
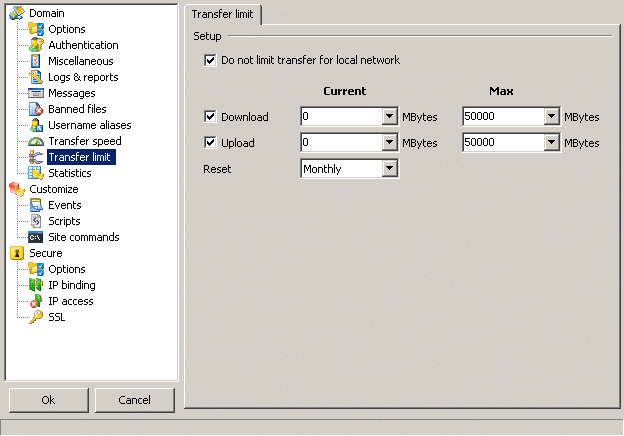
Miscellaneous :
Do not limit transfer for local IP : when connected from the lan, transfer limit will not be applied.
Setup :
Current : actual MBytes transferred.
Max : maximum MBytes that can be transferred.
Reset every (hour, day, week or month) : the limit will be reset every selected period.
As a hosting company you could allocate your user a maximum traffic per month using this option.
| |
|
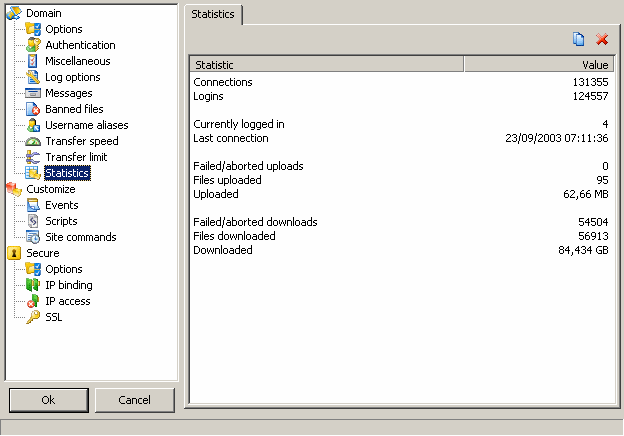
Connections : number of connection.
Login : number of logged users.
Failed logins : number of failed connection.
Currently logged in : number of users.
Last connection : date of last connection.
Last username : last login used (for alias).
Last IP : last known IP.
Failed/aborted uploads : number of failed uploads.
Files uploaded : number of files uploaded.
Uploaded : amount uploaded.
Failed/aborted downloads : number of failed downloads.
Files downloaded : number of files downloaded.
Downloaded : amount downloaded.
You can copy the current stats to the clipboard or reset them using the tool buttons.
| |
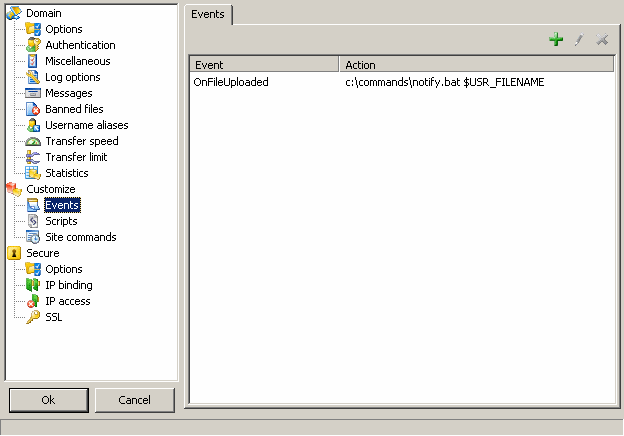
| Events options are useful for acting on a server event.
OnClientBanned : a client is banned from accessing your server.
OnClientConnected : a new client has connected.
OnClientDisconnected : a client has disconnected.
OnClientHammering : a client is hammering (connecting again and again).
OnClientLoggedIn : a client successfully logged in.
OnClientLoginFailed : a client failed to login.
OnClientTimeOut : a client connection has timed out.
OnDomainClosed : a domain is disabled.
OnDomainOpened : a domain is enabled.
OnDomainStarted : a domain is created.
OnDomainStopped : a domain is deleted.
OnDirCreated : a new directory is created.
OnDirDeleted : a directory is deleted.
OnDirListed : a directory is listed.
OnEveryDay : is fired every new day (midnight).
OnEveryHour : is fired every new hour.
OnFileBanned : an attempt to upload a banned file.
OnFileDeleted : a file is deleted.
OnFileDownloaded : a file is downloaded.
OnFileRenamed : a file is renamed.
OnFileUploaded : a file is uploaded.
OnFileUploadFailed : a file upload has failed.
OnIPChanged : (one of) the server IP has changed.
OnLogFileRotated : a log file is rotated.
OnQuotaExceeded : account quota is exceeded.
OnSameIPConnect : an already connected IP tries to connect.
OnScriptError : an error occurred in a script.
OnTooManyClient : too many clients connected to server.
For example, let's say you want to move all uploaded files into a different directory, not shared via ftp.
A solution is to create an event rule based on OnFileUploaded item :
- select Add (+ in toolbar)
- select OnFileUploaded event in drop down list
- browse for your script or application that will move the file to another place or enter "c:\temp\movescript.bat $USR_FILE_83"
- now create the movescript.bat : open notepad, click on menu / new, write "move %1 c:\safeplace\", click on menu / save to, enter c:\temp\movescript.bat.
Each time a file is uploaded it will be moved to c:\safeplace\
This option supports Tags. from "Tags and customization" chapter, depending on the tag's nature you may not use all tags. | |
|
For more information, see : Scripts
| |
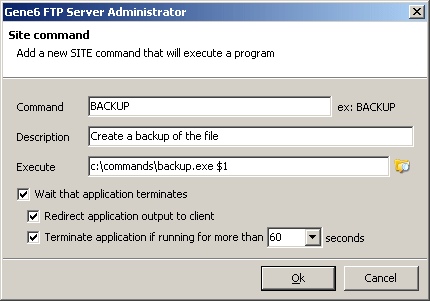
| Click add to define a new SITE command
Available command line tags :
$_ : number of parameters.
$0 : all parameters unparsed.
$1 : parameter 1
...
$n : parameter n
You can also use general tags : Tags
If you want that the application's output is returned to the user, check the "redirect application output to client" box, the server assumes the command returns formatted output (with error code).
It is also useful to define a timeout if your application takes too long to return.
| |
|
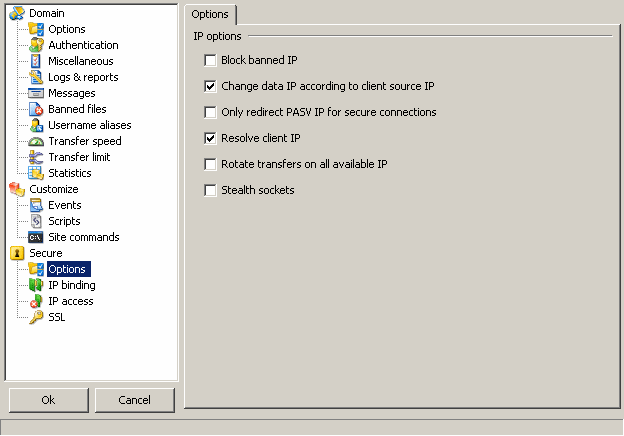
Block banned IP : banned IP (via access list or automatic banning) will not receive any message when trying to connect, they are just ignored.
Change data IP according to client source IP : depending on client's location (lan or wan) the server will chose which data connection path to use (lan or wan). This is used in PASV command reply.
Only redirect passive IP for secure connections : if you use a router that modifies the IP in the PASV reply, it will not be able to apply this change when you are securely connected, so to workardound this, check this option so that the IP is only replaced by the server when you are using a secure connection (you still need to set the passive IP to your public IP).
Resolve client IP : IP will be resolved to domain name (80.65.230.10 = ns0.gene6.net)
Rotate transfers on all available IP : data transfers will be initiated on different IP when possible to balance the load.
| |
| The important part of the domain.
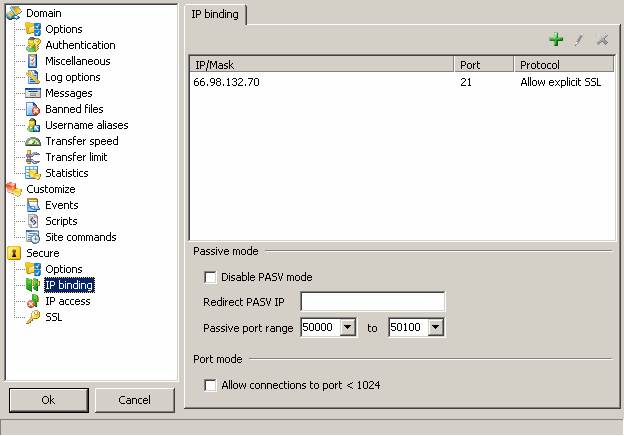
To run the domain, you need to select IP, port and protocol, click on the add button.
IP can be * (all available IP, simple if you have only one domain) or an IP from the available IP list.
Important note : if you are using a router it is useless to enter your public IP here as it is not assigned to your computer running the FTP server but to the router, the computer would only see the local private IP (see Tutorials to set up your server behind a router).
Port is by default 21 (common FTP port) but you can choose a different one for your domain (1021, 2156, 65021 ...)
A domain can listen on multiple different IP and port with different protocol, simply add new entries for other IP/port/protocol to use.
Security is where you can choose a protocol :
Regular FTP session only : normal FTP protocol, complies with RFC959 and spoken by all FTP clients.
Regular FTP session only, allow explicit SSL : in addition to FTP, explicit SSL can be used for the connection making it secure. The client can ask the server to switch to SSL when needed.
Implicit SSL : the difference with the previous mode is that the client can only talk SSL with the server, everything is encrypted, SSL can not be turned off.
Explicit SSL : only encrypted explicit SSL, no regular session. Once the client has received the server's banner (220 Gene6 FTP Server v3.0.0 (Build 34) ready...) it will issue the AUTH command requiring that everything becomes encrypted from this point so login and password are encrypted as well.
Recommended default : *, 21, Regular FTP session only, allow explicit SSL.
Passive mode :
Disable PASV mode : though not a good idea, you may want to disable passive mode data connection.
Redirect PASV IP : when behind a router, the published IP in passive mode may not be the correct public IP you are assigned, this setting allows you enter your internet IP or a hostname to resolve for the passive mode IP.
Passive port range : narrowing the open passive port range can be useful when behind a router or firewall. When using a router, this port range needs to be forwarded.
Port mode :
Allow connections to port < 1024 : as port < 1024 can host reserved services such as pop3, smtp, http, reserving data ports to non reserved ports will avoid connections to these services. (this method can be used to scan a 3rd party host)
| |
|
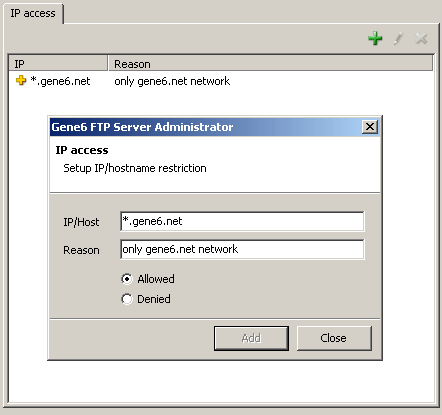
Defining restriction such as IP access permits you to deny or allow access only to users you trust.
You can enter IP addresses and hostnames.
For example :
+*.gene6.net (alone) allows anyone with a domain name from gene6.net to connect, someone not matching this rule will be denied access.
-*.gene6.net (alone) allows everyone to connect except someone from gene6.net.
Notes:
- You can use *, ?, [x-y] in IP addresses and hostnames : [192-193].16?.[0-10].*, *.net?.nerim.fr
- To have domain names resolved at runtime (like myftp.dyndns.org) in the access list, enter the address between parenthesis like this : (myftp.dydns.org)
- CIDR convention is supported : 192.168.0.0/24 (addresses in the range 192.168.0.0 - 192.168.0.255), 12.23.34.128/29 (addresses in the range 12.23.34.128 - 12.23.34.136)
| |
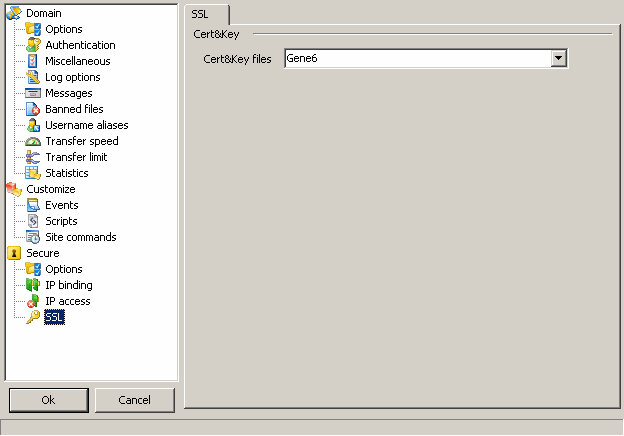
| SSL, Secure Socket Layer, is the encryption used in G6FTP Server to encrypt your data.
To use SSL you need to create a self signed certificate first.
By using the SSL standard for your data transfers you are guaranteed that your data cannot be read by anyone except the intended recipient.
(see : http://developer.netscape.com/tech/security/ssl/howitworks.html)
You need a SSL FTP Client as well to secure connection between client and server.
Certificates :
Cert and Key files : select the certificate you created in certificates management.
| |
|
|
|