 | To start a server and make it available for your users, you need to create accounts so they can access your files.
In the domain : click on Users folder, right click and select 'New', a new window will open asking for the name of the new account.Double click on the user account you want to edit.
You can have an unlimited number of user accounts
Clicking on each main category (User, Customize and Secure) will bring a summary page detailing each sub category.
|  |
 | To help you setup a new account, the wizard will prompt you with the basic options you need to set.
First step, choose the new account name and its password.
The password is saved by default as MD5 hash, case is important; you can use the password generator to generate a random password composed of 8 chars (letter and number), it is copied to clipboard after generation (you can paste it as text with mouse menu or Ctrl+V).
Second step, select the home directory of the user account, that is the directory in which the user is after login.
(default access rights are Read, List files, List folders, Subdirectory)
The full options windows will be open after clicking on finish (this can be disabled in Administrator / Tools / Options / Open user's properties after creation).
|  |
 | This first options page contains the basics settings, allowing you to enable/disable an account and to set password type.
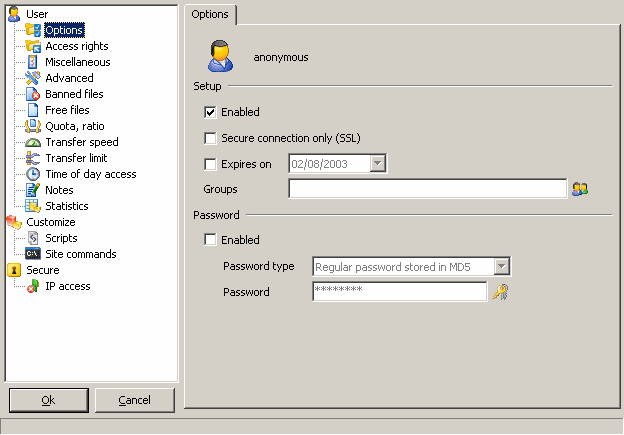
Enabled : enable/disabled the account.
Secure connection only (SSL) : the account will only be available via SSL connection, unsecure connection will be refused.
Expires on : the account will be valid until the expiry date.
Groups : assigning user a group, permits more flexibility of account options.
Password type : Accept email address, Authenticate against NT database, OTP S/KEY MD5, Regular password, Regular password stored in MD5.
Password : the password to use with the login name.
Depending on password type, password will be accepted and stored differently :
- Accept email address : accepted password will be of the form : user@domain.com
- Authenticate against NT database : the password will be checked againt NT user account for the server login.
- OTP S/KEY MD5 : One Time Password, password supplied by user must be computed from a seed returned by the server at login sequence so that each time a different password is sent over the network. It requires a compliant FTP client (see http://www.ietf.org/rfc/rfc1938.txt).
- Regular password : password is stored in clear on server side. No special requirement from user.
- Regular password stored in MD5 : same as regular except a MD5 hash of the password is stored instead of clear text.
If you choose Authenticate agains NT database :
Impersonate : connected user will impersonate his Windows user account with restrictions and limitations set with Windows on this account. |  |
 | The most important part of the account, the directories and files that the user will be able to access, list and transfer.
See : Virtual File System
|  |
 | This page lets you setup various options; from message files to maximum connection this account will allow.
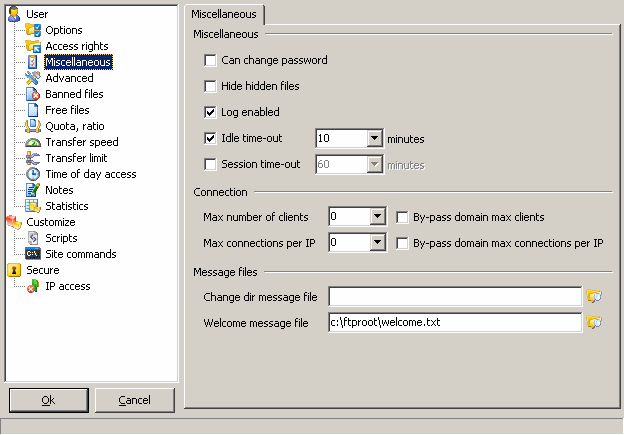
Miscellaneous :
Can change password : with use of "SITE PSWD oldpass newpass" command, the user can change his password.
Hide hidden files : files and directory with hidden file permission will not be shown in server files list.
Log enabled : if checked the activity of this account will be reported in server log.
Idle time-out : users who don't do anything for this period of time will be disconnected.
Session time-out : if enable, the user will be disconnected after this period of time.
Connection :
Max. number of clients : allows only N users to log in the server sharing the same account, default is unlimited.
By-passes domain max. clients : if the domain has a maximum user limit set, this option allows the user to login even if the maximum user limit is reached.
Max. connections per IP : allows only N connections of the same IP to log in to the server, default is unlimited.
By-passes domain max. connections per IP : if enabled, domain's respective option will be overriden by user's option.
Message files :
Change Dir message file : sent each time a user changes his current directory. (can be only a filename without path to use file from current directory)
Welcome message file : sent after the general domain welcome message.
|  |
 | On this page you can customize list options, restrict file size, setup third party transfer security.
Advanced :
Disabled commands : when you want to disable only some commands like XCRC, XMD5 for an anonymous account, enter them here separated by a coma.
(see : Documents for a list of supported FTP commands)
Excluded list options : allows you to restrict LIST & NLST parameters. Supported parameters are : a, A, B, c, i, k, p, Q, r, s, S, t, T, u, U, X (see below complete details).
Max. upload file size : file size greater than the defined size will be refused.
FXP, Server to Server :
Allow incoming server to server transfers : request to connect to another server for incoming data connection.
Allow outgoing server to server transfers : request to connect from another server for outgoing data connection.
|  |
 | Banned files are files that can't be stored on server.
You can specify file/path mask (?, * supported) : *.jpg, c:\path\images_200?\
Note :
- rules do not apply to download, only upload
- rules also apply when you rename a file
|  |
 | Free files are files that can be downloaded regardless of the ratio (if you are not using Ratio, leave it empty).
You can specify file/path mask (?, * supported) : *.jpg, c:\path\images_200?\
|  |
 | Inherited from BBS, ratios are implemented to give when you receive.
For example, if you want a user to get 1 byte of download for every byte they upload, the ratio is set to 1/1; 1 byte upload for 2 bytes to download makes a ratio of 1/2. If they upload a file of 100 bytes at a ratio set to 1/2, they will have 200 bytes for credit but only 50 bytes if the ratio is set to 2/1.
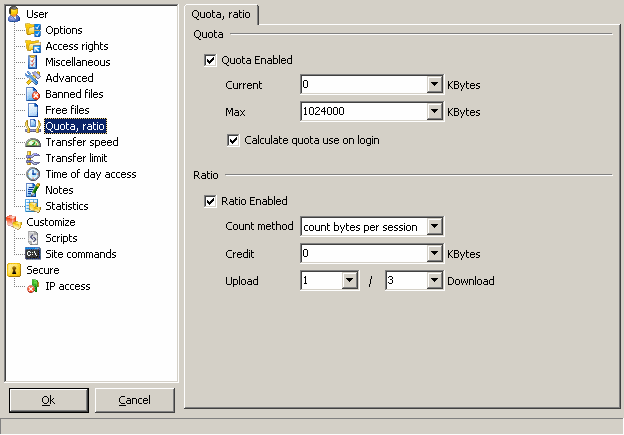
For uploads : new credit = current credit + ratio download / Ratio upload * file size
For downloads : new credit = current credit - file size
Count bytes per session / Count files per session : this credit is only valid for the time of their connect and is not shared by all users connected under this account.
Count bytes all sessions / Count files all sessions : this credit persists after a disconnect, so you will be given the credit you had the last time before you disconnected from the server.
Quota : this is feature allows you to set the maximum space each user can use on your server. Like Ratios, Quotas are calculated during upload (for REST method , etc.). A user cannot upload if he exceeds his quota => he needs to delete some files. If a user's quota is zero and he deletes a file, his quota remains at zero.
Calculate quota use on login : when checked, the server will update the currently used quota by browsing all user directories and counting bytes used (depending on the number of files and complexity of the directory structure, this can take some time).
|  |
 | As number of fast connections grows, a few users could easily saturate your total bandwidth.
To counter this, you can define maximum speed limit but also minimum speed limit.
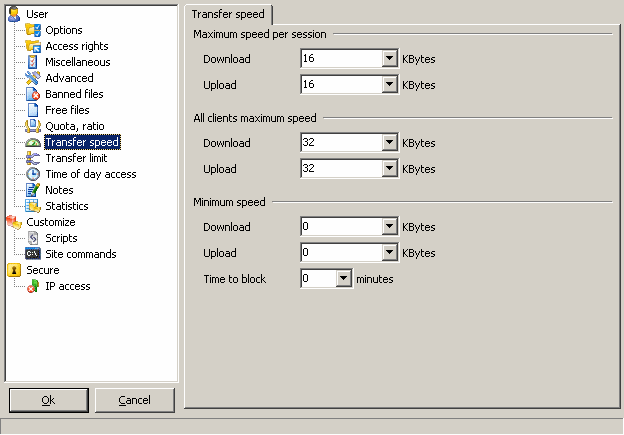
Maximum speed per session : each connection under this account will have the same limit (all users will have the same speed limit).
All clients maximum speed : the limit will be applied to all users connected under this account (if you have n connected users under this account, speed = (max speed)/n). A good example for this option is to limit the anonymous account overall speed.
Minimum speed : users below this limited speed will be disconnected and block for the amount of time defined.
All the settings can be combined : setting Maximum speed per session and All clients maximum speed will first put a speed limit on each user's connection, then an overall cap on all user's connections from this account.
Examples :
Problem : For an Anonymous account which can be used by many users you want to restrict the overall account bandwidth usage to 25 KB/s
Solution : Setup All client maximum speed to 25 KB/s, leave other settings to default.
Problem : One of your user is using a mass downloader tool which connects multiple times to download from the account.
Solution : Setup All client maximum speed to required speed, leave other settings to default, the mass downloader tool will be overall limited.
Problem : You have an Anonymous account and want that everyone gets his share of the bandwidth.
Solution : Setup Maximum speed per session to 25 KB/s, leave other settings to default. (additionally setup Max connection per IP to at least 2).
Problem : You have limited your server to 10 connections but one user is experiencing network problem and is very slow, busying one place.
Solution : Setup Minimum speed to 5 KB/s, leave other settings to default. If the user goes below the Minimum speed he will be disconnected and possibly blocked for a definable time.
|  |
 | Here you can setup a sort of quota transfer per day. It can be defined in upload or download and can be applied by day, week or month.
Setup :
Current : actual MBytes transferred.
Max : maximum MBytes that can be transferred.
Reset every (hour, day, week or month) : the limit will be reset every selected period.
As a hosting company you could allocate your user a maximum traffic per month using this option.
|  |
 | This part enables you to define access time restriction for the account.
You can define the restriction globally or for each day independently.
Enabled : activate or deactivate the restriction.
Use the same schedule every day : whether to apply the settings globally or to define access per day.
|  |
 | Leave some information like Name, Address, City, E-mail and more.
This information can be accessed via Tags to use in scripts or events.
|  |
 | Reporting status of account.
Connections : number of connection.
Login : number of logged users.
Failed logins : number of failed connection.
Currently logged in : number of users.
Last connection : date of last connection.
Last username : last login used (for alias).
Last IP : last known IP.
Failed/aborted uploads : number of failed uploads.
Files uploaded : number of files uploaded.
Uploaded : amount uploaded.
Failed/aborted downloads : number of failed downloads.
Files downloaded : number of files downloaded.
Downloaded : amount downloaded.
You can copy the current stats to the clipboard or reset them using the tool buttons.
|  |
 | Selecting scripts to run for this account.
For more information, see : Scripts
|  |
 |
Click add to define a new SITE command
Available command line tags :
$_ : number of parameters.
$0 : all parameters unparsed.
$1 : parameter 1
...
$n : parameter n
You can also use general tags : Tags
If you want that the application's output is returned to the user, check the "redirect application output to client" box, the server assumes the command returns formatted output (with error code).
It is also useful to define a timeout if your application takes too long to return.
|  |
 |
Defining restriction such as IP access permits you to deny or allow access only to users you trust.
You can enter IP addresses and hostnames.
For example :
+*.gene6.net (alone) allows anyone with a domain name from gene6.net to connect, someone not matching this rule will be denied access.
-*.gene6.net (alone) allows everyone to connect except someone from gene6.net.
Notes:
- You can use *, ?, [x-y] in IP addresses and hostnames : [192-193].16?.[0-10].*, *.net?.nerim.fr
- To have domain names resolved at runtime (like myftp.dyndns.org) in the access list, enter the address between parenthesis like this : (myftp.dydns.org)
- CIDR convention is supported : 192.168.0.0/24 (addresses in the range 192.168.0.0 - 192.168.0.255), 12.23.34.128/29 (addresses in the range 12.23.34.128 - 12.23.34.136)
(Don't forget server and domain ip access list will have priority on user account ip access list)
|  |
 | User class is a special account that applies its settings to the members of the class, this allows the administrator to set main global settings for all members of the class. Unlike a group a user can only be a member of 1 class and not more, this permits more variations of options.
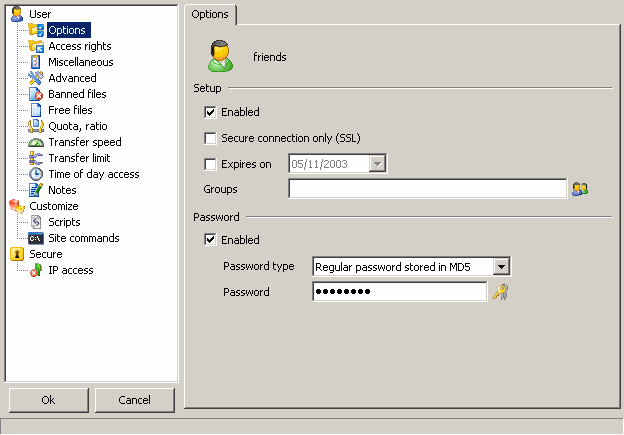
A user class will keep almost all user properties (statistics will be unused so it won't be displayed when you edit its properties) and will be used as a parent for users.
You will then be able to attach user accounts to this class. Users attached to a class will use most of its parent properties and will have less editable properties (for example, in quota/ratio, you will only be able to edit ratio credit and quota current).
If you disable the user class then all users attached to this class will be disabled. If user class is enabled then you can disable users one by one.
If you set a password for the user class, all users attached to this class will use the same password settings. If no password is set, you will be able to specify a password at the user level (same thing for expiration).
Here is a list of the properties that you won't be able to change for users attached to a class (settings will be inherited from the class) :
- All options in Miscellaneous, Advanced, Transfer speed, Time of day access, Scripts
- Groups will be the same as in the class
- in Quota/ratio, you will only be able to edit ratio credit and quota current if quota/ratio is enable at user class level.
Clients won't be able to login as a user class.
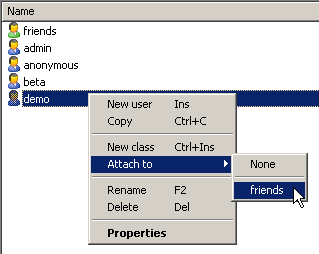
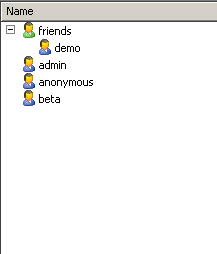
Creating a class is similar to creating a user account (see above). To attach an user to a class, select it, then right click and select "Attach to" and the class you want to put it in.
  |  |
|

|
|